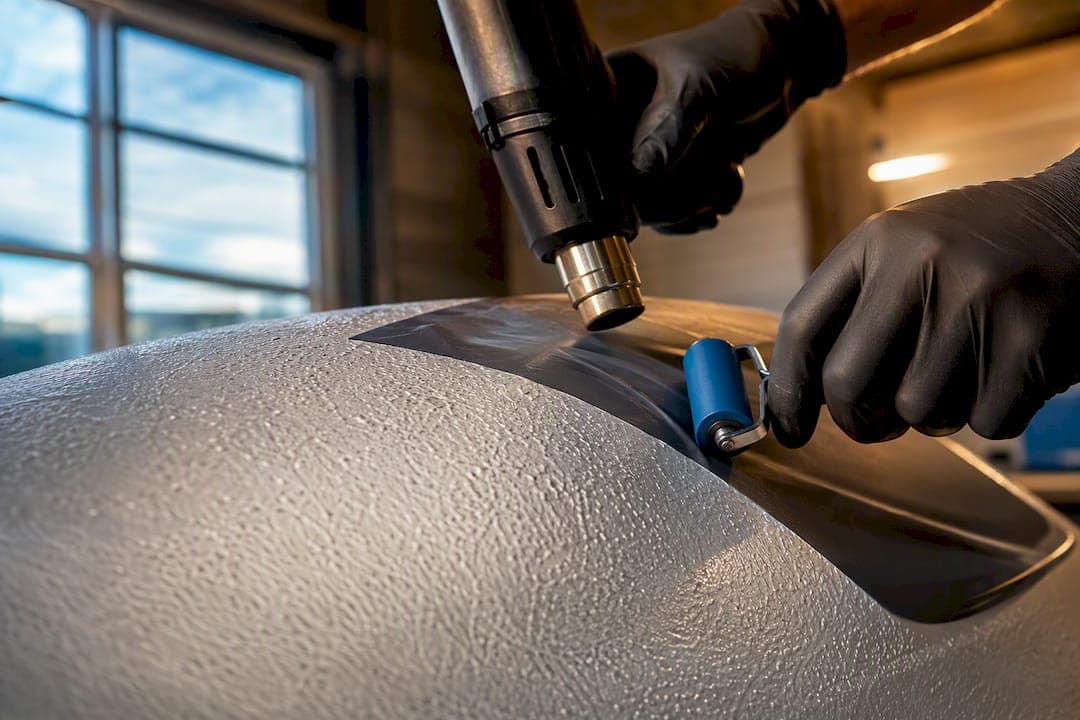
Yes, decals will stick to a mildly textured hull if you choose marine-grade, high-tack cast vinyl and apply it with a heat-and-conform technique inside the right temperature window. Light orange-peel or knockdown gel coat is workable. Deep stomp texture or bare porous fiberglass usually is not, and those surfaces call for smoothing, a different placement, or a professional install instead.
TL;DR:
- Cast vinyl with high-tack marine adhesive is required for reliable decal adhesion on textured gel coats, especially those with irregular or porous surfaces.
- Proper surface preparation includes thorough cleaning, residue removal, alcohol wiping, and testing with a small vinyl sample before full application.
- Applying decals in stable, warm conditions between 65 and 85 degrees Fahrenheit and using heat and pressure in small sections improves durability.
- Deep stomp or heavily porous surfaces often require smoothing or professional installation, as even high-tack film may fail on such textures.
- Edge lift and premature failure can be mitigated by careful re-heating, re-pressing, and avoiding high-pressure washing or moisture exposure immediately after application.
Table of Contents
- What Kind of Decal Works on a Textured Hull?
- How Do You Prep a Textured Hull Before Applying Decals?
- Step-by-Step: Applying Decals to an Uneven Hull Surface
- Fixing Bubbles, Edge Lift, and Other Textured-Hull Problems
- When Should You Skip the Decal and Choose a Different Spot?
- Brand-Backed Guidance for Marine Decal Installs
- An Installer's Honest Take on Textured Hulls
- Get Compliant, Marine-Grade Decals Built for Real Hulls
- Sources
What Kind of Decal Works on a Textured Hull?
Not every vinyl behaves the same way once it meets a bumpy gel coat surface, and this is where most DIY installs go wrong before the applicator even touches the boat.
Cast vinyl beats calendered vinyl on textured surfaces, full stop. Cast vinyl is manufactured by pouring liquid vinyl onto a casting sheet, which leaves it thinner, more flexible, and better at flowing into microtexture than calendered vinyl, which is baked and stretched under heat and tends to spring back to its original shape. That memory effect is exactly what causes edges to lift off a rough panel a few weeks after installation. Marine-grade cast vinyl with UV protection and a stronger adhesive consistently outperforms the generic "waterproof sticker" material sold at big box stores, which is built for flat laptop lids and water bottles, not curved, sun-baked hulls.
Texture creates tiny voids the adhesive has to bridge, and a standard-tack film simply cannot fill them. Rough or textured gel coat leaves air pockets that reduce the actual contact area between vinyl and substrate, which is the root cause of most premature lifting on textured transoms. That is why high-tack or specialized marine adhesives matter more here than on a smooth fiberglass panel, where a standard-tack film would be fine.
Here is what to look for when you are choosing material:
- Cast vinyl construction, not calendered, for flexibility and conformability
- High-tack or aggressive marine adhesive rated for gel coat and rough substrates
- UV-stable laminate to resist fading and cracking under constant sun exposure
- A film rated specifically for marine or saltwater exposure, not general outdoor use
Pro Tip: If you're not sure whether a listing is cast or calendered vinyl, ask the seller directly. Reputable marine decal suppliers list this specification; if they can't answer, that's a red flag.
Sizing matters just as much as material. A design scaled from flat photos or a laptop mockup can distort once it wraps around a curved transom. Designers recommend photographing the actual vessel and accounting for hull geometry before finalizing dimensions, since a number set that looks perfectly proportioned on a screen can stretch or compress once it follows the curve of a rounded stern. Keep registration numbers slightly smaller than the maximum legal size on curved panels, giving yourself margin so the decal doesn't have to stretch past its comfortable limit to fit.
How Do You Prep a Textured Hull Before Applying Decals?
Surface prep decides whether your decal lasts three seasons or three weeks, and it starts well before you peel any backing paper.
- Wash the area with soap and water, then let it dry completely. Skip this and you are just moving dirt around under the adhesive.
- Remove wax, polish, or silicone residue. Any protective coating on the hull will sit between the vinyl and the gel coat, and adhesive cannot bond to a barrier it can't see through.
- Wipe with isopropyl alcohol using a lint-free cloth, working in one direction rather than circles. Surface contamination from wax, silicone, oil, or fingerprints is one of the most common reasons decals fail early, because contaminants block the adhesive from wetting into the microtexture the way it needs to.
- Let the alcohol fully evaporate. A minute or two is usually enough, but don't rush this in cold or humid conditions.
- Run an adhesion test. Cut a small scrap of the same vinyl, roughly three to four inches, and apply it to the actual texture you'll be working with. Testing a small sample area first tells you whether the film will conform to that specific texture before you commit a full decal and design fee to the attempt.
- Check the temperature. Adhesives need warmth to flow and grip properly. Applying vinyl below about 50°F compresses adhesive flow into the microtexture and raises the odds of edge lift once vibration and moisture start working on it. Aim for a dry day somewhere in the 65 to 85°F range, and avoid installing in direct midday sun on a black or dark-colored hull, where surface temperatures can run far hotter than the air.
- Address heavy texture if needed. A light hand-sand with very fine grit can knock down aggressive peaks without cutting into gel coat, but only on areas that will be fully covered by the decal, and only if you're confident in your technique. When in doubt, don't sand. Choose a smoother panel instead.
Pro Tip: Photograph your test patch after 24 hours. If the edges are already curling on the sample, they'll curl on the full decal too, and you've just saved yourself a wasted install.
Step-by-Step: Applying Decals to an Uneven Hull Surface
Once your surface is clean, dry, and tested, the actual application comes down to patience and working in small sections rather than fighting the whole decal at once.
Tools you'll want on hand:
- A felt-edged squeegee, which won't scratch the vinyl or gel coat the way a hard plastic edge can
- A heat gun or household hairdryer for softening vinyl so it flows into texture
- A soft roller or a clean tennis ball for pressing vinyl into low spots without leaving pressure marks
- Isopropyl alcohol and lint-free cloths for final wipe-downs
- Masking or painter's tape for the hinge method
- A spray bottle with a mild soap-and-water solution if you're using a wet application
Follow these steps in order:
- Position and tape the decal using the hinge method. Lay the decal where you want it, then tape one edge to the hull as a hinge point. This lets you fold the rest back out of the way while keeping your alignment locked in, which matters a lot more on a curved panel where there's no straight reference line to eyeball against.
- Decide between wet and dry application. Dry application gives a stronger initial bond and is generally preferred for textured gel coat, but it leaves less room to reposition. A wet slip solution, a light mist of soapy water, buys you time to slide the decal into place and is worth using on larger registration numbers where alignment mistakes are costly. Just know that wet application on rough texture can trap moisture in the voids if you don't work it out during pressing.
- Peel back the transfer tape from one section at a time, exposing only a few inches of adhesive at once rather than the whole decal.
- Warm that small section with the heat gun or hairdryer, keeping it moving so you don't scorch the vinyl or blister the gel coat underneath.
- Press firmly with the soft roller or tennis ball, working from the center of the section outward to push out air and force the vinyl down into the low points of the texture. Field reports from experienced installers consistently back this incremental heat-and-press approach over trying to lay down a large decal in one pass.
- Move to the next section and repeat, overlapping your heated zones slightly so you don't leave a cold seam between passes.
- Remove the transfer tape slowly, pulling it back flat against the surface rather than up and away, which helps keep freshly pressed edges from lifting with it.
- Do a final pass with the roller over the whole decal, paying extra attention to edges and any spot that still shows a faint air pocket under the surface.
That last pass matters more on textured hulls than smooth ones. An edge that looks sealed on a flat panel can still have a pinhole gap over a textured peak, and that's exactly where water finds its way in first.
Fixing Bubbles, Edge Lift, and Other Textured-Hull Problems
Most decal failures on textured hulls trace back to one of four causes: application in cold weather, leftover surface contamination, using a standard-tack film on an aggressive texture, or tiny air pockets that never got pressed out during install.
Edge lift is the most common complaint, and it's also the most fixable if you catch it early. Reheat the lifted section with a hairdryer on low to medium heat, then press it back down firmly with a roller, working from the good adhesion outward toward the lifted edge. Small bubbles respond to the same treatment: warm gently, then push the air toward the nearest edge and out, rather than trying to pop and patch them.
If an edge keeps lifting no matter how many times you reheat it, some installers turn to a thin bead of marine-grade sealant like a marine caulk to stop water from wicking underneath. It works, but treat it as a last resort. Sealant makes future removal considerably messier and can leave a visible residue line once the decal eventually comes off.
A few habits keep decals looking good longer on any textured hull:
- Skip close-range pressure washing near decal edges; the water jet finds gaps a garden hose never would.
- Do a visual edge check every month or two during boating season.
- Reheat and re-seat any soft spots the moment you notice them, before moisture gets a foothold.
If more than a quarter of the decal has lifted or the vinyl has visibly cracked, stop patching and remove it properly instead. A full replacement on clean, freshly prepped material almost always outlasts a patchwork repair on tired adhesive.
When Should You Skip the Decal and Choose a Different Spot?
Some textures just aren't worth fighting. Deep stomp finishes, heavy popcorn-style gel coat, and raw, porous, unpainted fiberglass tend to defeat even high-tack cast vinyl, because the voids are too large and too irregular for any adhesive to bridge reliably.
When you're staring down a panel like that, you have real options:
- Shift to a smoother nearby panel. Registration rules generally require legibility and a reasonable location, not a specific exact spot, so a flatter section a few inches over often solves the whole problem.
- Mount a rigid plate instead of a direct-stick decal, especially on aluminum hulls with heavy texture or rivets.
- Bring in a professional installer who has the tools and experience to work aggressive texture, particularly for a large or expensive custom design you don't want to risk on a first attempt.
Whatever you decide, keep registration number placement and legibility requirements in mind. Moving to a smoother panel only helps if it still satisfies your state's rules for visibility and positioning.
Brand-Backed Guidance for Marine Decal Installs
Marine-grade vinyl that's UV-safe and saltwater-proof is recommended for textured hulls. An online design tool lets you enter your registration numbers and pick colors and fonts in a few minutes, with production running 3 to 5 business days and free shipping across the contiguous United States.
For readers planning a full install, the step-by-step installation guide walks through application in more detail, and the article on applying decals before ceramic coating is worth reading if your hull is due for a coating job, since sequencing the two jobs wrong can undo both. The guide to marine vinyl types breaks down the material differences covered earlier in more depth.

An Installer's Honest Take on Textured Hulls
Textured hulls are a trade-off, not a guarantee. Even the best marine-grade cast vinyl asks more of the adhesive than a flat panel does, and no amount of heat gun work turns a deep-stomp texture into a smooth one. Test a small sample first, photograph the placement before you commit to the full decal, and treat that photo as your insurance policy if something drifts or lifts later. The boats that keep their decals for years are almost always the ones where someone slowed down at the prep stage instead of rushing straight to the squeegee.
— Taylor
Get Compliant, Marine-Grade Decals Built for Real Hulls
A practical alternative to guessing your way through a DIY vinyl order from a generic sign shop is available. Decals ship on marine-grade, UV-safe, saltwater-proof vinyl built to handle the conditions this guide walks through, cut to state's exact size and spacing rules, with production in 3 to 5 business days and free shipping across the contiguous United States.
The online design tool puts your registration numbers, colors, and fonts together in a few minutes, so you're not stuck eyeballing font sizing against a state statute. If you're weighing how long a fresh set should hold up on your hull, the page on how long marine vinyl decals last is worth a look before you order. Head to the design tool now, enter your numbers, and get a compliant set moving toward your driveway this week.
Sources
For more on technique, see DIY vinyl decal application steps and how custom decal materials differ.
- Boat Decal Customization Options: Your 2026 Guide
- Waterproof Stickers for Boats That Don’t Fade, Crack or Peel
- Vinyl decals on textured walls: a complete guide
- Forum: sealing decal edges with marine-grade sealant