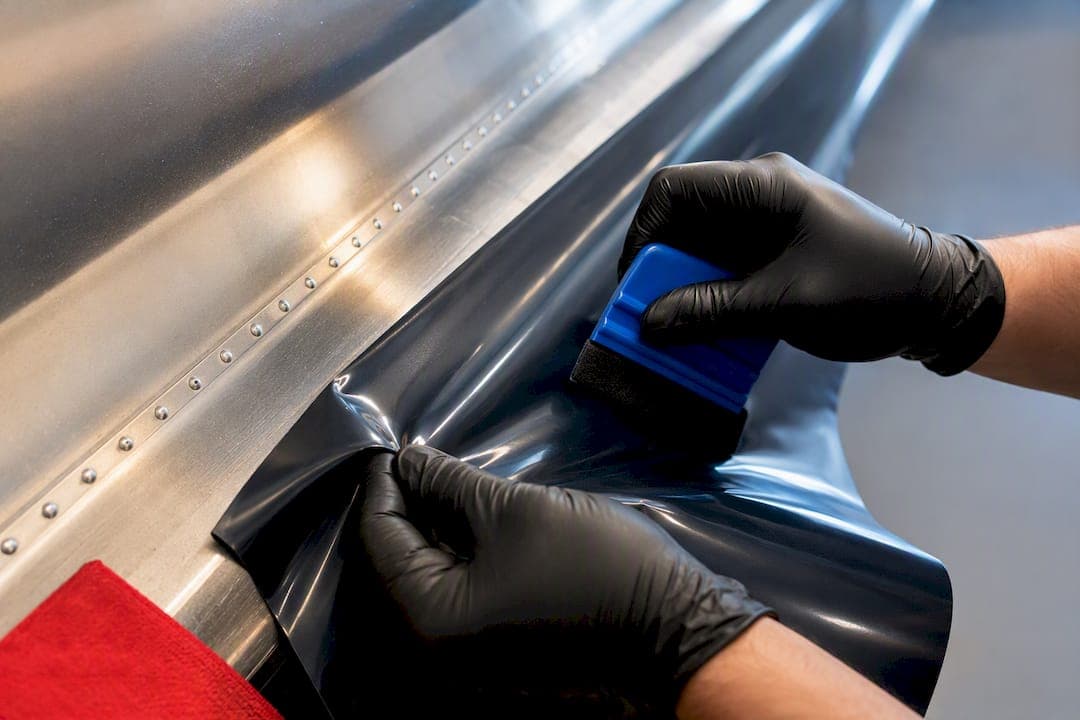
Yes, you can apply decals or vinyl over rivets, and done right, they'll stay put for years. Scale modelers need decal setting solutions like Micro Set and Micro Sol, gentle seating, and a pin to release trapped air before the paint job cures. Vehicle and marine installers need conformable cast vinyl, premasking, careful squeegee technique, a rivet brush, and controlled heat. The tools are simple: a rivet brush, an air-release tool, a heat gun, and a good squeegee cover most jobs.
TL;DR:
- Cast vinyl is essential for applying decals over riveted surfaces, as it conforms better and avoids tenting or lifting over complex contours.
- Micro Set and Micro Sol are key decal setting solutions that soften and help the decal drape into rivet details without cracking or bridging.
- Proper surface preparation requires thorough cleaning, drying, and inspection for any surface damage or residue before applying decals.
- Using tools like a rivet brush, heat gun, and precise squeegee techniques reduces trapped air and ensures a long-lasting bond around rivet heads.
- For marine applications, marine-grade vinyl with UV and saltwater resistance is recommended, especially on textured or aluminum hulls with rivet patterns.
Table of Contents
- How Do You Choose the Right Film and Tools for Decals Over Rivets?
- How Do You Prepare a Riveted Surface Before Applying a Decal?
- What's the Step-by-Step Process for Applying Decals Over Rivets?
- What Rivet-Specific Techniques Keep Air From Getting Trapped?
- How Do You Fix Bubbles, Lifting, or Cracking Around Rivets?
- Where Installers Get Extra Guidance on Boat Decals and Rivets
- What the Manuals Don't Tell You About Rivets
- Order Marine-Grade Decals Built to Handle Rivets and Salt Water
- Sources
- FAQ
How Do You Choose the Right Film and Tools for Decals Over Rivets?
The film you pick matters more than any technique you'll learn later. Cast vinyl is manufactured by casting liquid polymer onto a sheet, which lets it hold its shape without much internal stress. That's exactly what you want when the film has to wrap around a raised rivet head and settle back down flat on the other side. Avery Dennison's vehicle wrap guidelines specifically recommend cast films for contoured and riveted surfaces because calendered vinyl, made by stretching and rolling the material into sheets, tends to hold onto that internal tension. Around a convex rivet, that tension shows up later as tenting or lifting.
Calendered film isn't useless. It's fine for flat panels, short-term signage, or budget jobs where a rivet or two sits in a low-stress zone. Just don't reach for it on a hull covered in rows of rivets and expect it to behave the same way over a five-year lifespan.
For model decals, the equation is different. You're not fighting adhesive tension. You're fighting thin, brittle decal film that cracks if you push it too hard. That's where Microscale's Micro Set and Micro Sol system comes in: Micro Set preps the surface and holds the decal in position, while Micro Sol chemically softens the decal film so it drapes into rivet detail instead of bridging over it. Use Micro Sol sparingly on glossy or freshly painted surfaces, since it's strong enough to disturb some paint finishes if you overapply it.
Here's what belongs in your kit before you start either job:
- Rivet brush (nylon bristle, sized for automotive or marine work) for burnishing film down around raised rivet heads without scratching the surface
- Squeegee, felt-edged for delicate or printed film, firmer rigid-edge for heavy-duty vinyl
- Air-release tool or fine sewing needle for popping trapped bubbles cleanly
- Heat gun with adjustable output (most vinyl work stays in the 200 to 300°F range)
- Premask or application tape for printed graphics that need to travel from backing to surface as one unit
- A sharp snap-blade knife for relief cuts near seams and corrugations
- Nitrile or cotton application gloves to keep skin oils off the adhesive side
For long runs of rivets on trailers, tanks, or truck panels, a foam roller tool like the RollePro system reduces pinholes because it maintains a small air channel while pressing the film down, according to installer accounts published in Signs of the Times.
How Do You Prepare a Riveted Surface Before Applying a Decal?
Every surface you're about to work on should be treated as dirty, even if it looks clean. Wax, salt film, mold-release residue, and fine oxidation all sit on riveted panels in ways that aren't always visible, and any of them will undercut adhesion months later. Avery Dennison's application bulletins call for a full clean and complete dry time before any film touches the surface, and that instruction applies just as much to a jon boat hull as it does to a transit bus.
Work through these steps before you lay anything down:
- Wash and degrease the panel with an isopropyl alcohol solution or a solvent your film manufacturer approves, working into the seams around each rivet where grime collects.
- Let it dry completely. A heat gun on low speeds this up on stubborn damp spots, but never use an open flame near vinyl or painted surfaces.
- Inspect paint and primer around every rivet for chalking, flaking, or hairline cracks. Fix those first. Film applied over failing paint will fail with it.
- Mark your registration points with a grease pencil or low-tack tape so you know exactly where the graphic lands before you commit.
- Choose your hinge method. A top-hinge (taping the top edge and folding the film down like a curtain) works well for wide horizontal graphics. A center-hinge, splitting the piece down the middle and working outward in both directions, gives you more control on long panels with several rivet rows.
- Map your relief cuts in advance. If the panel has deep corrugations or a dense cluster of rivets, decide now where you'll notch or tuck the film rather than discovering it mid-application.
Model builders skip most of this list, but the paint-inspection step still applies. Check for mold release residue on resin kits and light sanding marks on styrene before any decal touches the surface. A decal set over a rough or dusty finish will trap air no matter how much Micro Sol you use.
What's the Step-by-Step Process for Applying Decals Over Rivets?
The workflow splits into two distinct paths depending on what you're working on. Trying to borrow techniques from one for the other usually ends badly. Heat that's perfectly safe on cast vinyl will curl a thin water-slide decal in seconds.
Applying model decals over rivet detail
- Brush a thin coat of Micro Set onto the model surface where the decal will land.
- Slide the decal off its backing paper directly into the wet Micro Set and nudge it into final position with a soft brush or toothpick.
- Blot gently with a paper towel or cotton swab, pressing from the center outward, never scrubbing.
- Where the decal crosses a rivet or raised panel line, apply Micro Sol directly on top. It will look like the decal is wrinkling or dissolving. That's normal. Leave it alone and let it dry.
- Once dry, check for any dome of trapped air over a rivet. Prick it with a fine pin at a shallow angle, right at the base of the raised detail, then press the film flat with a cotton swab.
- Let the model cure for a few hours before handling or clear-coating. Rushing this step is the single most common reason modelers end up with a cloudy or lifted decal.
Pro Tip: Keep a magnifier or headband loupe on hand for rivet-heavy kits. Pinholes over 1:35 or 1:48 scale rivet detail are easy to misplace by a millimeter, and that's the difference between a clean release and a torn decal.
Applying vinyl over rivets on a boat, trailer, or vehicle panel
- Hinge the premasked film in place using tape along one edge, checking alignment against your marked registration points.
- Peel back the liner in small sections as you go, never all at once.
- Squeegee from the center outward with firm, overlapping strokes, following the stroke technique Avery Dennison outlines for large format graphics. Keep the squeegee's leading edge tracking down the center of each rivet row rather than crossing it at an angle.
- When you reach a rivet row, ease off direct squeegee pressure and switch to the rivet brush, working in small circular motions to seat the film into the recess around each rivet head.
- Apply short bursts of heat, ten to fifteen seconds at a time, to relax the film right before brushing it down. This makes a real difference on cast vinyl over compound curves.
- Re-squeegee the whole section after a few minutes of dwell time. Vinyl continues to settle slightly as it warms and cools, and a second pass catches spots that looked fine initially but crept loose.
- If a stretch of hull has rivets spaced closer than the film can comfortably conform to without stress marks, stop stretching and switch to an inlay or a relief-cut-and-tuck approach instead. Forcing film past its stretch limit sets up a slow-motion failure that shows up as lifting weeks later.
What Rivet-Specific Techniques Keep Air From Getting Trapped?
Trapped air is the enemy on any riveted surface, and rivets create dozens of small pockets where it likes to hide. The fix depends on whether you catch it during application or after the film has already set.

Cold brushing works best while the film is still workable. Start your rivet brush strokes from the outer edge of the raised area and spiral inward toward the rivet head, pushing air ahead of the brush rather than trapping it underneath. Doing this before the adhesive fully grabs gives you a second and third chance if the first pass misses a pocket.
Needle-based air release comes into play once a bubble has already formed. Insert a fine needle at a low angle right where the rivet meets the flat panel, not straight into the dome of the bubble. That angle lets air escape without leaving a visible puncture mark once you brush the film flat again.
Controlled heat loosens the adhesive just enough to reposition film without peeling it back to the liner. Short bursts, not sustained blasting, keep the vinyl from overheating and popping the adhesive bond entirely, which is a real risk with prolonged heat exposure near rivet edges. 3M's rivet brush is built specifically for this combination of heat-then-brush work, letting installers burnish film flush without scoring the surface.
Roller technique matters most on long rivet rows, like the sides of an aluminum boat or a utility trailer. Leave a small air egress channel as you roll rather than sealing the film edge to edge in one pass. Some installers alternate rolling half the rivet row upward and half downward, which prevents air from getting pushed into a dead end with nowhere to escape.
For panels with deep corrugations or rivets clustered in tight, irregular patterns, none of these tricks substitute for an inlay. Cutting the graphic into separate pieces that meet at a seam near the rivet cluster, rather than trying to stretch one continuous piece across it, is the more durable call even though it takes longer.
How Do You Fix Bubbles, Lifting, or Cracking Around Rivets?
Most post-application problems trace back to one of three causes: trapped air that wasn't released during install, film that was stretched past its limit, or a surface that wasn't fully clean or dry before application. Here's how to handle each.
- Small bubbles, typically appearing within the first few days, respond well to a needle puncture at a low angle followed by a re-squeegee toward the hole. A brief, gentle heat pass can help the film relax back into place before you press it flat.
- Tented film around a rivet head usually means the vinyl bridged instead of conforming. Release trapped air with a needle, then use heat and rivet-brushing to seat it properly. If the film has already stretched thin and lost its memory, cutting a small relief slit and tucking the excess is more reliable than fighting it back into shape.
- Lifting edges near seams or panel lines call for a clean of the mating surface, then a re-squeeze once any old adhesive contamination is removed. Persistent lifting in the same spot after a second attempt usually points to a local inlay repair rather than another round of squeegeeing.
- Cracking, more common on model decals than vinyl, generally means the decal was forced into position dry instead of softened first, or moved after it had already begun to set.
Long-term durability comes down to giving the film its full dwell time before exposing it to pressure washing, and choosing an overlaminate where UV exposure or saltwater spray is constant. 3M's own weathering bulletins note that even well-applied graphics show gradual gloss loss and occasional edge lifting over time, which is a material aging process, not necessarily an installation error. If a panel needs repeated repair in the same spot every season, that's usually the signal to call in a professional rather than keep patching it yourself, especially on multi-panel jobs or boats that see rough water regularly.
Where Installers Get Extra Guidance on Boat Decals and Rivets
Registrationdecals has built out a set of installer guides that go deeper into specific surface challenges than any single article can. The guide to applying vinyl registration decals walks through the full install sequence for hull graphics. For boats with texture or gelcoat variation, the textured hull playbook covers heat and press adjustments specific to that surface. Aluminum hulls, where rivets are the rule rather than the exception, get their own breakdown in the aluminum boat decal guide, and anyone dealing with a bubble that's already formed can go straight to the bubble repair walkthrough.
Every decal Registrationdecals produces uses marine-grade vinyl chosen for UV and saltwater resistance, since boat hulls face a harsher environment than most vehicle graphics ever will. Orders run through production in three to five business days, with free shipping across the contiguous United States.
If you've worked out a rivet technique that solved a problem this guide didn't cover, that kind of field knowledge is worth sharing with other installers working the same conditions.
What the Manuals Don't Tell You About Rivets
Manufacturer bulletins get you most of the way there, but they're written for the average case, not the stubborn one. Avery Dennison and 3M will tell you cast vinyl beats calendered film on contoured surfaces, and they're right. What they don't spend much time on is the judgment call: knowing when a rivet pattern has crossed from "difficult but doable" into "this needs an inlay, not more heat."

That's the gap most DIY installs fall into. People keep reaching for more heat or more squeegee pressure when the actual fix is a relief cut and a second piece of film. Stretching cast vinyl past its comfortable limit doesn't fail immediately. It fails in six weeks, when the panel's been through a few heat cycles and the film finally lets go at the seam it was never meant to hold.
The other overlooked point is how differently model work and vehicle work should be approached, even though both start with the same word: decal. A modeler reaching for a heat gun because a boat detailer swears by it is heading toward a ruined kit. Chemistry, not heat, is what makes thin decal film cooperate with fine rivet detail. Get that distinction straight before you touch a rivet with any tool, and most of the common failures in this guide never happen in the first place.
— Taylor
Order Marine-Grade Decals Built to Handle Rivets and Salt Water
Registrationdecals makes the film choice easy for boat owners: every decal ships in marine-grade, UV-resistant, saltwater-proof vinyl, the same cast-style material this guide recommends for riveted and contoured hulls. You design your set online in minutes, entering your registration numbers and picking colors and fonts, and it arrives in three to five business days with free shipping anywhere in the contiguous United States.

If your hull has rivets, aluminum seams, or a textured finish, pair your order with the installation walkthrough for a full step-by-step on getting it seated right the first time. Aluminum boat owners in particular should check the Aluminum Boat Numbers page, sized and specified for exactly this kind of surface. Ready to get your numbers ordered? Head to Custom Boat Registration Numbers & Decals and build your set now.
Sources
- Avery Dennison — Vehicle wrap guidelines (IB640)
- 3M — Rivet brush (product page)
- Microscale — Micro Set / Micro Sol system instructions
FAQ
Why Isn't Riveting Used as Much Anymore?
Riveting has been largely replaced by welding, adhesives, and mechanical fasteners in modern manufacturing because those methods are faster and don't require access to both sides of a panel. Riveted construction still shows up widely on aluminum boats, aircraft-style hulls, and older trailers, which is exactly why decal application around rivets remains a common installer question.
Do You Apply Vinyl Decals Wet or Dry?
Most vinyl film, especially cast vinyl with a strong permanent adhesive, goes on dry using a hinge-and-squeegee method rather than a wet slide technique. A wet application method, sometimes using a soapy water solution, is occasionally used for large flat panels to allow repositioning, but it's not recommended near rivets, where trapped water is harder to squeegee out from the recesses.
Can I Put a Decal Over Another Decal?
Layering a new decal directly over an old one is possible on a flat surface but risky over rivets, since the added thickness makes tenting and lifting more likely. The better approach is to remove the old decal completely, clean the surface as if starting fresh, and apply the new one following the same prep and application steps covered above.
Can You Use Mod Podge Over Vinyl Stickers?
Mod Podge and similar craft sealants aren't recommended over vinyl decals meant for outdoor or marine exposure, since they aren't formulated to handle UV exposure or saltwater the way a proper vinyl overlaminate is. For boat decals specifically, a dedicated marine-grade overlaminate protects better than a craft sealant and won't yellow or crack under sun exposure.
What's the Best Vinyl for Boat Decals Over Rivets?
Cast vinyl is the better choice for riveted and contoured hulls because it conforms without the internal tension that causes calendered film to tent. Registrationdecals uses marine-grade, UV-resistant, saltwater-proof vinyl for exactly this reason, with sets priced at $35.99 per order through the main product page.