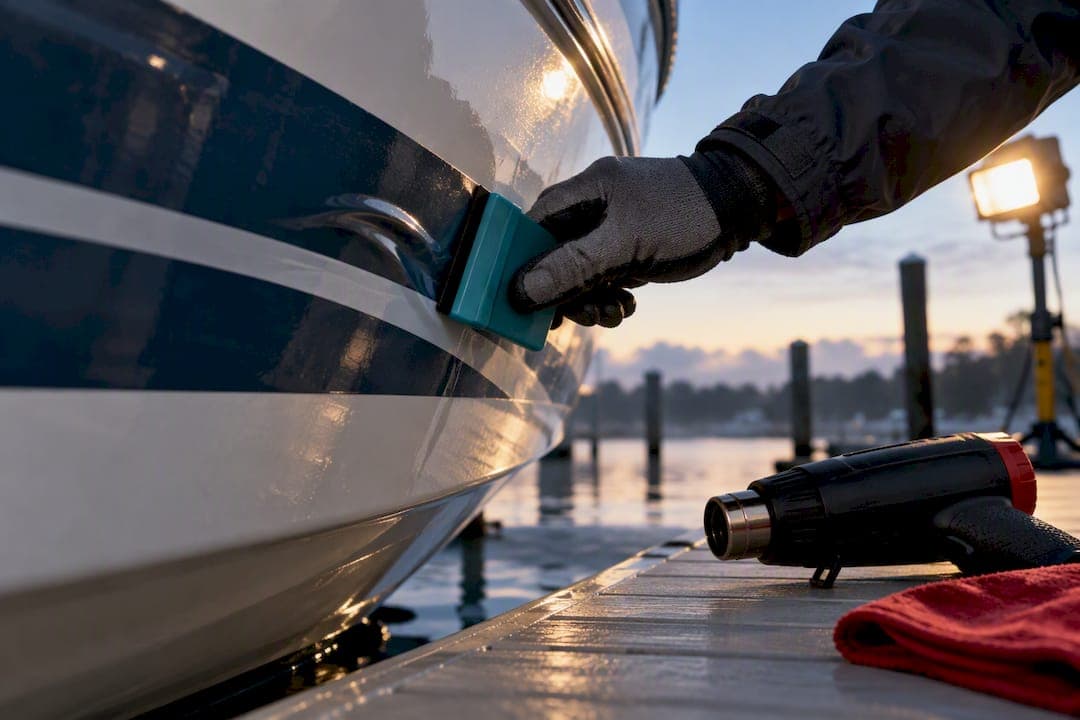
The fastest fix for most bubbles in boat decals is gentle heat plus squeegeeing air toward the nearest edge, done while the adhesive is still soft. Tiny pinholes often flatten out on their own within 24 to 72 hours as the adhesive finishes curing. If a bubble survives that window, or the decal shows contamination or lifting edges, move to the needle method or plan a full reapply instead of fighting it with heat alone.
TL;DR:
- Small bubbles within 24 hours often self-correct as the adhesive cures, but larger or persistent bubbles require heat and squeegeeing for full removal.
- Use gentle finger pressure and low heat on fresh decals, and avoid aggressive heat until the adhesive has set, to prevent shifting or damage.
- Piercing stubborn bubbles with a fine needle releases trapped air smoothly, especially when contamination prevents proper bonding.
- Reapplying decals is necessary when bubbles repeatedly reappear, edges lift, or surface contamination is identified, rather than trying to fix long-term issues with heat alone.
- Preventative steps include cleaning surfaces thoroughly with alcohol, avoiding cold weather during installation, and using marine-grade cast vinyl on textured or curved hulls.
Table of Contents
- How Do You Fix Bubbles in Boat Decals Within the First 24 Hours?
- What's the Right Way to Heat and Squeegee Larger Bubbles?
- When Should You Use the Needle Method on Stubborn Bubbles?
- How Do You Remove and Reapply a Decal That Won't Stay Fixed?
- How Can You Prevent Bubbles From Forming the Next Time?
- What Tools and Materials Do You Actually Need?
- When Should You Call a Pro or Just Replace the Decal?
- An Installer's View on the Mistakes Behind Most Bubbles
- When New Decals Beat Another Repair Attempt
- Sources
- FAQ
How Do You Fix Bubbles in Boat Decals Within the First 24 Hours?
Fresh installs are forgiving. Marine-grade vinyl adhesive stays workable for the first day or so after application, which is exactly why a bubble spotted within 24 hours is the easiest one you'll ever deal with. Wait past that window and the adhesive sets harder, making the same fix take more heat and more patience.
Here's the sequence that works on a fresh install:
- Locate the bubble and check its size. Anything smaller than a pencil eraser is often not worth touching yet.
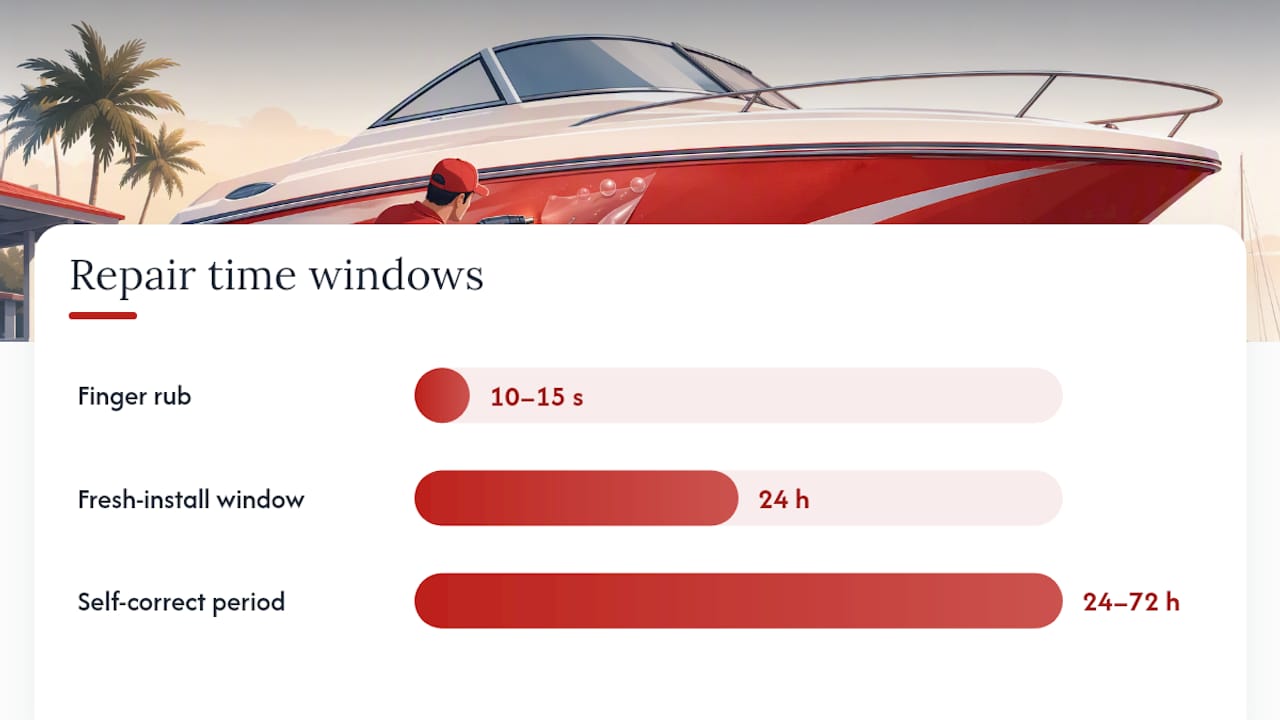
- Warm-finger press: rub the bubble firmly with your thumb or the pad of your finger for 10 to 15 seconds to generate a little friction heat, then push toward the nearest edge in one steady motion.
- Resqueegee while the area is still warm. Use overlapping strokes moving from the center of the bubble outward, applying even pressure rather than jabbing at the spot.
- Check the result. If the air escaped, the vinyl should lie flat and slightly tacky to the touch.
- If a pinhole bubble remains, leave it alone for a day or two. Adhesive continues to flow and bond during that period, and small bubbles often self-correct within 24 to 72 hours without any tool touching the vinyl.
Pro Tip: Work in indirect light or shade when you're squeegeeing a fresh install. Direct sun makes the vinyl tacky and harder to control, and it can trick you into thinking a bubble is gone when it's just temporarily flattened by heat.
Don't reach for a heat gun on day one unless the bubble is genuinely large. Overworking a fresh install with heat before the adhesive has had a chance to settle can actually shift the decal position, which creates a bigger headache than the bubble you started with.
What's the Right Way to Heat and Squeegee Larger Bubbles?
Medium and large bubbles need real heat, not just finger pressure, because the trapped air has to be softened out of vinyl that's already partially set. Warming the vinyl before smoothing helps the adhesive bond evenly, but the heat source and distance matter as much as the technique itself.
A hair dryer on a low or medium setting is the safer starting point for boat owners without marine graphics experience. It's harder to overheat vinyl or scorch gel coat with a hair dryer than with a heat gun, though a heat gun set low and kept moving works faster on stubborn bubbles once you're comfortable with the process.
- Hold the heat source 4 to 6 inches from the surface and keep it moving constantly.
- Aim for surface temperatures in the rough range of 150 to 180 degrees Fahrenheit. A touch test works fine if you don't own an infrared thermometer: the vinyl should feel warm and pliable, never hot enough to sting your fingers.
- Squeegee from the center of the bubble toward the nearest edge, then let the area cool for 10 to 15 seconds to let the adhesive re-set.
- Repeat the warm, squeegee, cool cycle two or three times on stubborn spots rather than blasting one long heat pass.
Roughly one to three heat cycles resolves most medium-sized bubbles on flat gel coat surfaces, though curved or textured hulls, like riveted aluminum, sometimes need extra passes to fully seat the vinyl.
Watch two things closely. First, too much heat stretches thin cast vinyl, and installers rely on short bursts with immediate pressure specifically to avoid overstretching the film. Second, painted hulls and gel coat can discolor or soften under sustained heat, so never park a heat gun in one spot for more than a couple seconds.
When Should You Use the Needle Method on Stubborn Bubbles?
Reach for a needle when a bubble is too large to have self-healed after a few days, but small and isolated enough that reapplying the whole decal feels like overkill. This method works because it releases trapped air through a hole so tiny it disappears once resealed, rather than trying to force air sideways through vinyl that's already cured in place.
A fine sewing needle or a straight pin does the job better than anything thicker. Thick pins like a large safety pin leave a mark you'll actually notice later.
- Warm the bubble slightly with a hair dryer for a few seconds so the vinyl relaxes.
- Pierce the edge of the bubble, never the center, holding the needle at roughly a 20-degree angle so the hole seals more cleanly.
- Press the trapped air toward the puncture using your finger or a squeegee, working from the opposite side of the bubble.
- Squeegee flat and apply brief heat again to reseal the adhesive around the tiny opening.
- Run your finger over the spot to confirm it's flat, then check it again in bright light from a couple of angles.
This is the technique professional installers rely on for bubbles that survived the first repair attempt, and it works because the needle hole is smaller than the surface texture of most marine vinyl.
Pro Tip: Angle the needle so you're piercing toward the nearest edge of the decal, not straight down. That way, if any adhesive residue pushes up through the hole, it's easier to wipe away without smearing it across the graphic.
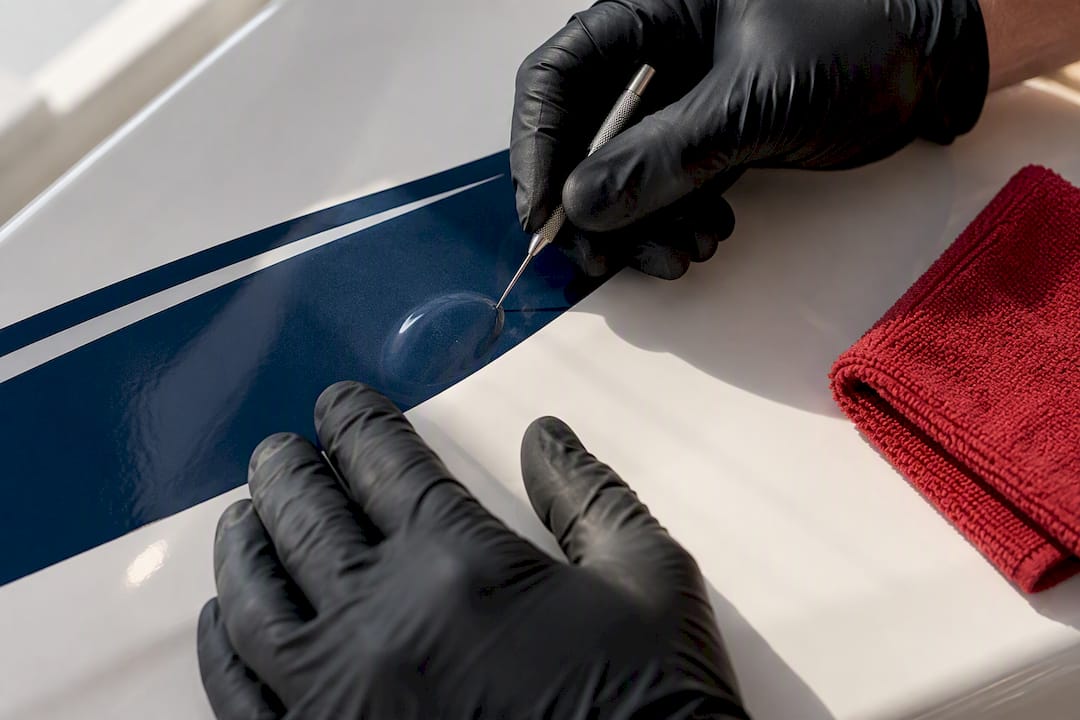
The needle method has limits. It won't help if contamination caused the bubble in the first place, since dust or oil trapped under the vinyl will keep the adhesive from properly rebonding no matter how much air you release.
How Do You Remove and Reapply a Decal That Won't Stay Fixed?
Reapplication is the right call when bubbles keep coming back in the same spot, when several areas show lifting edges at once, or when you can tell surface contamination is the real problem rather than trapped air. Fighting a contamination issue with a needle just buys you a few weeks before the same bubble returns.
- Warm the decal with a hair dryer to soften the adhesive bond.
- Peel at a low angle, roughly parallel to the surface rather than straight up, lifting slowly so the vinyl doesn't tear or leave adhesive strings.
- Clean the surface with 70% or higher isopropyl alcohol on a lint-free cloth, working in one direction rather than scrubbing in circles.
- Run a water-bead test before reapplying: pour a little water on the cleaned area, and if it beads up instead of spreading flat, there's still wax or residue to remove.
- Reapply using the hinge or tape method, taping the top edge of the decal in place first, then folding it back and squeegeeing forward in overlapping strokes rather than laying the whole sheet down at once.
If you're dealing with old adhesive residue left behind from the previous decal, a dedicated removal and cleanup guide walks you through getting the hull surface fully back to bare gel coat before you start over.
How Can You Prevent Bubbles From Forming the Next Time?
Nearly every bubble problem traces back to one of three things: a dirty surface, the wrong temperature, or rushed squeegee technique. Fix those three and you'll rarely see a bubble worth writing home about.
Start with the surface. Wipe it down with 70% or higher isopropyl alcohol on a clean, lint-free cloth, and skip any cleaner that contains wax or silicone, since both leave a film that vinyl adhesive can't grip. Run the water-bead test described above before you peel the backing off anything. If water sheets flat across the surface, you're clear to apply.
Temperature matters more than most boat owners expect. Try to install decals when the air and hull surface are above 60 degrees Fahrenheit. Cold vinyl gets stiff and stubborn, which makes trapped air far more likely because the material won't lie flat on the first pass.
- Use the hinge or tape method for anything larger than a small numbers set, taping one edge down first and working the rest into place gradually.
- Squeegee from the center outward in overlapping strokes, never side to side in one pass.
- Apply firm, even pressure. Light pressure leaves pockets of air you won't notice until the sun heats the hull later that day.
- Choose cast marine vinyl over calendared vinyl for anything going on a curved or riveted surface, since cast vinyl flexes with contours instead of fighting them.
Pro Tip: If your boat's registration numbers sit on a riveted aluminum hull, check a textured hull installation guide before you start. Rivets and seams are the number one spot where trapped air hides on aluminum boats.
An overlaminate layer adds one more layer of insurance on top of good technique. It seals the printed graphic and edges against saltwater and UV, which is part of why properly finished marine decals hold up for years rather than months.
What Tools and Materials Do You Actually Need?
A basic bubble-repair kit costs less than a tank of gas and covers nearly every situation described above.
- A felt-edged squeegee, which won't scratch vinyl the way a hard plastic edge can.
- A hair dryer for most jobs, or a heat gun on a low setting for stubborn bubbles and cooler weather installs.
- A fine sewing needle or a thin straight pin for the needle method.
- 70% or higher isopropyl alcohol for surface prep and residue cleanup.
- Lint-free microfiber cloths, since paper towels shed fibers that get trapped under vinyl.
- Application or transfer tape if you're reapplying a full decal rather than patching a bubble.
Marine supply stores, auto parts stores, and general hardware stores all stock these items, and none of it requires a specialty vendor. If you already own a hair dryer and a bottle of rubbing alcohol, you likely have 80% of what this job needs sitting in a bathroom cabinet.
When Should You Call a Pro or Just Replace the Decal?
Call in a professional installer, or plan on ordering a replacement, when you're seeing bubbles across multiple areas of the same decal, when the vinyl feels stiff or brittle rather than pliable under heat, or when a repair holds for a week and then fails again in the same spot. Repeated failure in one location almost always means contamination under the adhesive that heat and needles can't solve.
Before contacting anyone, gather a few basics: photos of the affected area in daylight, the approximate install date, and a quick note on what you've already tried. That saves a back and forth and gets you a faster, more accurate answer.
If the vinyl has gone brittle, faded, or the adhesive has failed across a wide area, repair time isn't worth it. A fresh decal, properly applied, beats another round of heat and squeegee on material that's already past its useful life.
An Installer's View on the Mistakes Behind Most Bubbles
Most bubble complaints trace back to one of three habits: skipping the alcohol wipe, installing on a cold hull, or pressing from the edges inward instead of the center outward. That last one traps air right in the middle of the decal, exactly where it's hardest to reach later.
Experienced installers reach for gentle heat and a squeegee first every single time, because it's reversible and low risk. A needle only comes out once heat has clearly failed. Full removal gets recommended only when the surface itself, not the technique, is the problem. That's the honest order of operations, and skipping straight to aggressive fixes usually creates more work than it saves.
— Taylor
When New Decals Beat Another Repair Attempt
Sometimes the smartest fix isn't a fix at all. If your registration numbers are brittle, sun-faded, or lifting across more than a small patch, ordering a new set from Registrationdecals costs less time and frustration than another round of heat and squeegee on vinyl that's already past saving.
Every set is cut from marine-grade vinyl built to resist UV fading and saltwater, the two things that quietly ruin most boat decals over the years. The company offers an online design tool where you enter your registration numbers and pick colors and fonts, and orders typically ship within a few business days with free shipping across the contiguous United States. That turnaround matters when you're staring at a decal that's beyond another repair attempt and want the boat back on the water looking right.
Whether you're replacing numbers on a runabout, a pontoon, or an aluminum hull, start with the custom boat registration numbers and decals page to build your set, then check the installation walkthrough so the new decal goes on clean, warm, and bubble-free the first time.
Sources
- How to Remove Air Bubbles from Decals and Stickers - Royal Elements
- How to Apply Decals Without Bubbles: Full Guide
FAQ
How Do You Fix Bubbles in Decals?
Warm the bubble gently with a hair dryer, then squeegee from the center toward the nearest edge in overlapping strokes. For bubbles that survive this treatment, a fine needle inserted at the bubble's edge releases the trapped air without leaving a visible mark.
Do Vinyl Air Bubbles Go Away on Their Own?
Small pinhole bubbles often flatten out within 24 to 72 hours as the adhesive finishes curing and bonding to the surface. Larger blisters rarely resolve without help and need either the heat-and-squeegee method or a needle repair.
Will Heat Get Air Bubbles Out of a Sticker?
Yes. Warming vinyl to roughly 150 to 180 degrees Fahrenheit softens the adhesive enough to squeegee trapped air toward the nearest edge, and most medium-sized bubbles clear within a few heat cycles. Keep the heat source moving and never let one spot sit too long, especially on painted hulls.
How Do You Fix Bubbled Vinyl That Won't Flatten?
If heat and squeegeeing don't fully clear a bubble, pierce its edge with a fine needle at a shallow angle and press the air toward the hole, then reheat and squeegee to reseal. When bubbles keep returning in the same spot, the surface likely has contamination underneath, and the honest fix is removing the decal, cleaning the hull, and reapplying or ordering a replacement set.