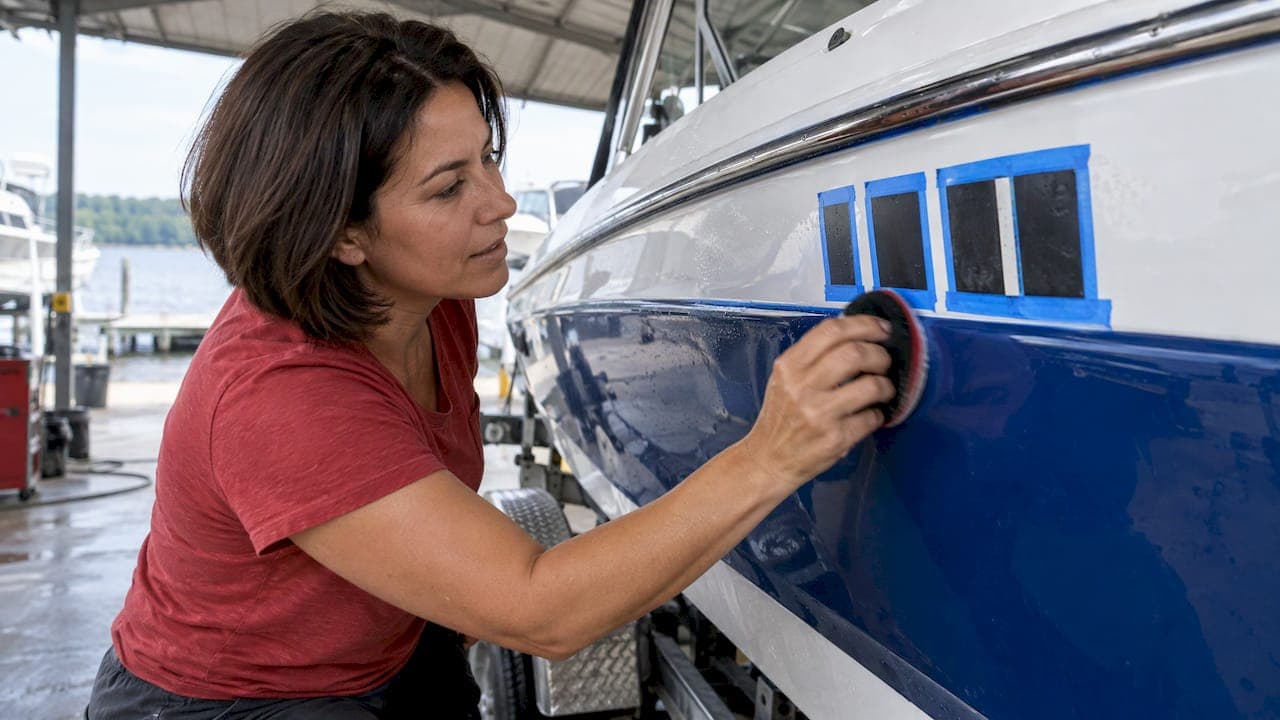
To polish around boat decals, tape the vinyl off with blue painter's tape, keep the polisher pad flat and away from the edges, and finish by hand near the tape line. Clean the area first, work in the shade, and test any product on a small spot before you commit. Buffers lift edges and burn vinyl. Ten minutes of masking prevents both.
This guide covers the full job: prep, masking, which products and tools suit gelcoat next to vinyl, whether you can wax over the decal itself, and what to do about the faint outline (ghosting) that shows up around older graphics.
TL;DR
- Mask every decal and registration number with blue painter's tape, pressed down firmly, before any buffer touches the hull.
- Polish the gelcoat, not the vinyl. Stay a finger-width or more from the edges and finish the last stretch by hand with a microfiber pad.
- Only buff sound, smooth gelcoat, and work in the shade so the product does not dry before you wipe it off.
- Wax or sealant over vinyl is product-specific: some are fine applied very thinly, and wax left on a surface can hurt the adhesion of new graphics.
- Ghosting is a difference in gelcoat color and gloss, so it is a polishing job on the gelcoat, not something you fix by scrubbing the decal.
Table of Contents
- Why decals complicate a polishing job
- Before you start: check the condition of the surface
- What you need
- Step by step: polishing gelcoat around decals
- Which products are safe near vinyl
- Can you wax or seal over the decals?
- Dealing with ghosting and oxidation lines
- Common mistakes
- Our perspective
- Replace worn numbers after you polish
- FAQ
- Sources
Why decals complicate a polishing job
Gelcoat and vinyl react very differently to the same treatment. Gelcoat is hard, and a compound or polish removes a thin layer of oxidized surface to bring back gloss. Vinyl is a thin, flexible film held down by adhesive. Its edges are the weak point.
Three things go wrong most often:
- Edge lift. A spinning pad catches a corner of a number or stripe and peels it back. Polish can also seep underneath an edge and loosen the adhesive, a risk noted in decal-care guidance.
- Heat damage. Friction from a rotary buffer builds heat quickly. Boat owners on one MasterCraft owner forum describe burned vinyl and edges caught by a buffer, and they call masking the safest bet.
- Residue and halos. Dried compound packs into the gap along a decal edge and leaves a white crust that is tedious to pick out.
None of this means you have to leave the decals alone and live with dull gelcoat. It means the order of work matters.
Before you start: check the condition of the surface
Polishing is for gelcoat that is sound and smooth. One fiberglass care guide advises buffing only sound gelcoat and keeping decals outside the work area. If you see crazing, cracks or soft spots near a decal, stop and sort that out first. Cracks under a decal edge let water in and make the vinyl lift later. Our guide on inspecting and repairing gelcoat cracks before applying decals walks through what to look for.
Also look at the decals themselves:
- Edges already lifting? Do not polish near them. Press them down or replace the decal before you buff.
- Cracked or faded vinyl? Buffing near brittle vinyl will often finish it off. If the numbers are due for replacement anyway, plan to remove and replace them after the polishing job and apply the new set to freshly prepared gelcoat. We cover why in how to prevent boat decal fading.
- Registration numbers? These must stay legible. If a number is damaged during polishing, you will need a replacement set, so treat them with extra care.
What you need
A short kit covers nearly every case:
- Blue painter's tape (a wider roll makes the job faster)
- A soft deck brush and a bucket of boat wash
- Clean, soft microfiber towels and a microfiber applicator pad
- A non-abrasive boat polish, plus a compound only if the gelcoat is badly oxidized
- A dual-action or rotary polisher with foam pads (optional for small areas, which can be done by hand)
- A detailing spray made for vinyl, for cleaning the graphics afterward
One caution about wash products. Some products have built-in cleaners that suit paint and gelcoat but can degrade graphics, according to a graphics care article in PDB Magazine. Read the label, and keep all-in-one "cleaner wax" formulas off the vinyl.
Step by step: polishing gelcoat around decals
1. Wash the hull the gentle way
Wash with boat soap and a soft-bristle deck brush. The same PDB Magazine piece recommends avoiding pressure washers and using soft bristles around vinyl, with medium bristles only for stubborn stains elsewhere. A pressure washer aimed at an edge is a quick way to lift it. Rinse and dry completely so the tape sticks.

2. Work in the shade
Pick a cool, shaded spot. West Marine's gelcoat care guide warns against polishing or waxing in direct sunlight because the product dries too fast and becomes hard to remove. Dried product is exactly what ends up stuck in decal edges.
3. Mask every decal
If you are using a polisher, mask the vinyl with blue painter's tape. PDB Magazine says this protects the edges from lifting. Practical tips:
- Overlap the tape onto the gelcoat by about a quarter inch so the vinyl edge is fully covered, not just the face.
- Press the tape down firmly with a fingernail or a plastic card, so compound cannot creep under it.
- For lettering with lots of small gaps, such as registration numbers, tape the whole block as one rectangle instead of each character.
- Some owners cut the tape to the outline of a graphic with a hobby knife. Do this with a light touch so you do not score the gelcoat. A rectangle is safer for most people.
Boat Juice estimates masking takes about 30 minutes and saves hours of cleanup. Other guides also recommend taping around vinyl decals so you do not make a mess with compound or polish them by accident, for example this yacht-polishing guide.
4. Test your product first
Try the polish on a small, inconspicuous area to check it works with the surface, as decal-care guidance suggests. Wait for it to haze, wipe, and look at the result in raking light.
5. Polish the open gelcoat
Work in sections of about two square feet. Keep the pad flat on the surface, which helps prevent swirl marks. Use light pressure near the tape and let the pad do the work.
On tool choice, Better Boat says a dual-action orbital polisher is safer and friendlier for most users, because its random motion cuts down heat buildup considerably. That matters a lot near vinyl. If you own a rotary, keep it for the open hull and switch to a dual-action or hand application within a few inches of any tape line.
6. Finish the edges by hand
For the last stretch beside the tape, use a soft microfiber applicator pad and a small amount of polish. Decal-care guidance suggests keeping polish off the decal edges and working gently in circles. Small amounts of product are easier to remove than a thick coat.
7. Remove the tape and clean the vinyl
Pull the tape slowly, back on itself at a low angle, so you do not tug the vinyl. Then spray the vinyl with a detailing product and wipe it with a microfiber towel, as PDB Magazine recommends. This lifts any compound film left on the edges, and a quality detailing product also helps protect the vinyl from UV.
Check the edges under good light. Any white residue in the gap can be lifted with a damp microfiber wrapped around a fingertip.
Which products are safe near vinyl
| Product type | Near the decal | Notes |
|---|---|---|
| Non-abrasive polish, applied by hand | Yes, kept off the edges | Use a soft cloth or microfiber pad, working around the vinyl |
| Heavy compound | Open gelcoat only | Only for oxidized gelcoat, always with the vinyl masked |
| Cleaner wax or all-in-one | Avoid on vinyl | Built-in cleaners can degrade graphics |
| Vinyl detailing spray | Yes | Cleans without abrasives and adds UV protection |
| Solvent cleaners | Not for routine care | Reserved for removing wax before applying new graphics |
| Pressure washer | No | Can lift edges |
Can you wax or seal over the decals?
This is the question that trips people up, and the honest answer is that it depends on the product.
One manufacturer states that several of its waxes can be applied to vinyl decals if done very thinly. Collinite lists No. 520, 885, 845, 925, 915 and 476s as suitable for thin application on vinyl decals. That is a product-specific statement, not a license to use any wax you have on the shelf.
The other side of the coin is replacement. 3M indicates in its watercraft bulletin that marine wax can significantly reduce the adhesion of graphics and must be thoroughly removed with solvent-based cleaners before any new decal application. So wax on the hull is fine to live with, but it needs to be stripped off the spot where a new decal will go. Another 3M bulletin on film care advises that wax residue on the film can be removed with an all-purpose cleaner.
We go deeper on this in two of our guides: what wax is safe over vinyl numbers and how to apply decals on a waxed hull. If you plan to apply a ceramic coating, put the decals on first, as explained in our piece on decals before ceramic coating.
A simple rule: seal the gelcoat, and treat the vinyl separately with a vinyl-safe detailing product. Wax needs sealing over the polished surface or it will oxidize again fast. One owner discussion makes the point that polished gelcoat left unsealed re-oxidizes quickly, so plan on a sealant or wax across the open hull after polishing, taped off around the decals.

Dealing with ghosting and oxidation lines
Ghosting is the faint outline left after a decal has been on the hull for years, or the visible line around a decal on an older boat. It happens because the gelcoat under the vinyl was shielded from sun while the surrounding gelcoat oxidized and faded. When the decal comes off, the protected patch is glossier and often a different shade.
The way to deal with it is on the gelcoat:
- Remove the old decal with gentle heat and a plastic scraper, and take off adhesive residue. Boat Juice describes heat gun and scraper removal as the usual route for decals still in one piece, and an eraser wheel for brittle or cracked vinyl.
- Wash the area clean and let it dry.
- Compound the whole panel, not only the outline. Feather the edges of your work well beyond the ghost so the new gloss blends in.
- Follow with polish, then a sealant.
If the outline remains after compounding, the gelcoat may have a depth difference that is hard to remove, and the usual fix is to place a new decal over the area. Our guide on boat decals to cover damage explains what works and what is legal, which matters especially for registration numbers, since placement and format are regulated by state and federal rules.
If you are putting graphics back on after polishing, prep matters. Wipe the surface to remove all polish and wax residue, and apply with a method that keeps the adhesive clean, like the one in our soapy water application guide.
Common mistakes
- Skipping the tape on "just a quick pass." Edges lift on the quick pass.
- Using high speed near vinyl. Heat softens adhesive and can burn the film.
- Slathering product. More polish means more residue in the edge gap.
- Polishing in full sun. The product dries and bakes on.
- Buffing lifting or cracked decals. Replace them first.
- Forgetting the sealant. Bare, polished gelcoat dulls quickly.
Our perspective
We make registration decals from marine-grade vinyl chosen for UV and saltwater resistance, and we see how the job goes wrong from the other side: owners who buff a fresh set of numbers and watch an edge curl.
Our advice is always the same. Vinyl that is well applied to clean, sound gelcoat will hold up for seasons, and the best way to keep it that way is to treat polishing as a gelcoat job with the decals masked off. Registration numbers are not decoration. They have to stay readable and attached for legal use of the boat, so they deserve the extra ten minutes of tape.
If your numbers have faded, lifted or taken a hit from a buffer, replacing them is simple. Polish and seal the hull first, then apply a fresh set to the clean surface so the new vinyl sits on the best base it will ever have. Our design tool lets you enter your numbers, pick colors and fonts, and order in minutes.
Taylor
Replace worn numbers after you polish
If polishing showed you that your registration numbers are cracked, faded or lifting, the best time to replace them is right now, while the hull is clean and freshly prepped. Our custom boat registration decals are made in-house from marine-grade vinyl, designed to be UV-safe and saltwater-proof, and you build them online by entering your numbers and choosing colors and fonts. A set is $35.99, production takes 3 to 5 business days, and shipping is free across the contiguous United States.
Start on the custom registration numbers and decals page, or go straight to the version for your hull: center console, pontoon, bass boat, aluminum boat or jet ski. Not sure about size or placement? The registration number placement answers cover it. For longer life, our guide to making decals last with overlaminate is worth a read before you order.
FAQ
Can I use a buffer right up to the edge of a decal?
No. Even with tape on, keep the machine a few inches back and finish the strip beside the vinyl by hand. A spinning pad can catch an edge or build heat quickly, and owners report both burned vinyl and lifted corners from buffing too close.
What kind of tape should I use to mask decals?
Blue painter's tape is the common choice, and it is what PDB Magazine recommends for protecting vinyl edges from lifting. Overlap onto the gelcoat slightly, press it down firmly, and remove it slowly at a low angle. Do not leave it on for days in the sun, since adhesive can get harder to remove.
Is it safe to wax over registration numbers?
It depends on the wax. Some manufacturers say specific products can go on vinyl decals if applied very thinly, but others can reduce adhesion for later graphics. If you are unsure, tape off the numbers, wax the hull, and clean the vinyl with a vinyl-safe detailing spray.
Will polishing remove the outline left by an old decal?
Sometimes. Compounding the whole panel and feathering the edges often blends the outline, because the difference is usually oxidation in the surrounding gelcoat. If a visible edge remains, a new decal placed over the area is the usual fix.
Can I polish by hand instead of using a machine?
Yes, and it is often the better way near decals. A soft microfiber applicator pad and a small amount of non-abrasive polish give you control right up to the tape line. Machine polishing mainly saves time on large, open areas of hull.
Sources
- Mastering Decal Care: Effective Techniques To Polish Around Decals
- Gelcoat Care and Restoration Guide, West Marine
- Buffing a Fiberglass Boat: A Safe Gelcoat Workflow
- How To Clean And Protect Your Graphics, PDB Magazine
- Buffing over decals? MasterCraft TeamTalk
- A DIY Guide to Boat Compounding and Polishing, Boat Juice
- How to Polish a Boat, Comprehensive Guide
- Get That New Boat Feeling Again, gelcoat restoration guide
- How to Buff and Wax a Boat, Better Boat
- Car and Boat Detailing FAQs, Collinite
- Application: Special Considerations for Watercraft, 3M
- Storage, Handling, Maintenance and Removal of Films and Sheetings, 3M
- How to Remove Decals From Your Boat Without Damaging It, Boat Juice
- Boating discussion on re-oxidation of unsealed gelcoat