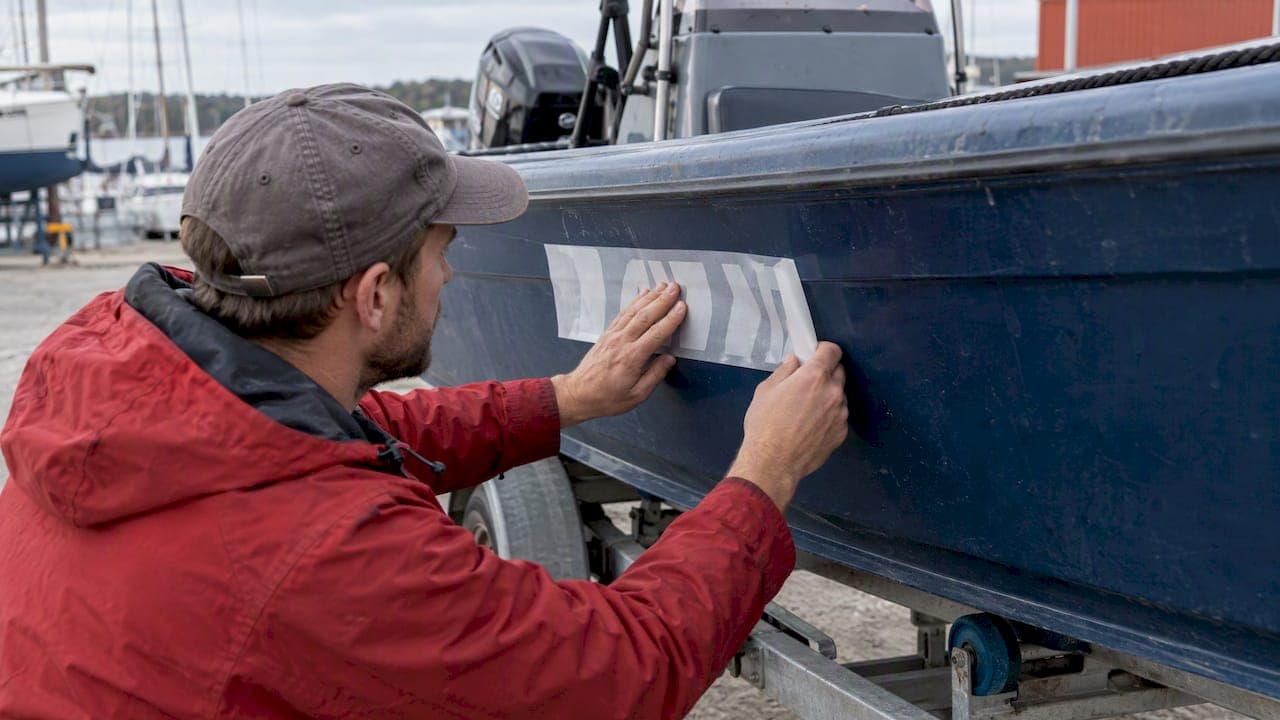
Vinyl can stay on a polyethylene boat, but only if you treat the hull as the hard case it is. Polyethylene is a low-surface-energy plastic, so ordinary adhesive struggles to wet out on it. The fix is a film with an adhesive designed for low-energy plastics, a spotless surface, careful application and a proper cure before the boat sees water. This guide covers each step for kayaks, rotomolded fishing boats, small skiffs, jet-ski hulls and other poly craft.
TL;DR
- Polyethylene resists bonding because its low surface energy keeps adhesive from spreading across it. Standard outdoor vinyl is not a safe assumption.
- Choose a film whose data sheet names low-energy plastics such as LDPE, HDPE or polypropylene, not just "outdoor" or "marine."
- Clean in two stages (detergent wash, then solvent wipe), apply right away, and give the adhesive 48 hours before launching.
- Keep decals above the waterline, and apply between 60 and 90°F (16 to 32°C).
- Registration numbers must stay readable, so test a small piece first and check your state's rules before you commit.
Table of Contents
- Why polyethylene is so hard to stick to
- Choosing the right vinyl and adhesive
- Preparing a polyethylene hull
- Applying the decal
- Primers, flame treatment and other tricks
- When decals will not stay: alternatives
- Registration numbers on a polyethylene boat
- Perspective: how we think about decals on poly hulls
- Order decals designed for your boat
- Troubleshooting lifting and peeling
- FAQ
- Sources
Why polyethylene is so hard to stick to
Most pressure-sensitive adhesives work by flowing across a surface and making intimate contact with it. That contact is called wet-out. Polyethylene is a low-surface-energy plastic, and 3M's research on bonding to low surface energy materials explains that adhesives may fail to wet its surface, which makes bonding difficult.
The practical result is familiar to any kayak or fishing-boat owner. A decal looks fine on day one, then the corners curl, the edges pick up dirt, and eventually it peels away in one piece. The vinyl itself did nothing wrong. The adhesive never gripped the hull.
Two things make poly hulls worse than painted fiberglass or aluminum:
- The surface is chemically quiet. There is little for the adhesive to bond with, so the film relies on a specially formulated adhesive plus a perfectly clean surface.
- The surface is often textured or slightly waxy-feeling. Rotomolded hulls can have a stippled finish, mold-release residue from manufacturing, and years of sunscreen, fish slime and boat soap.
If your hull has a heavy texture, our guide on keeping decals stuck on textured hulls covers the heat and press technique in detail.
Choosing the right vinyl and adhesive
The single most useful rule: pick a film that is explicitly built for low-energy plastics. A manufacturer's data sheet will say so. For example, one major film maker's technical data for its cast film series identifies its high-tack variants as adhering to low-energy LDPE, HDPE and polypropylene. That data sheet is a good illustration of why you should choose a film made for polyethylene rather than assume any outdoor vinyl will work.
Another example is a print wrap film with a permanent adhesive engineered for low-surface-energy plastics, which shows what to look for in a product description. You do not need that exact product. You need the same kind of statement on the label.
What to look for on the data sheet
| Check | Why it matters on polyethylene |
|---|---|
| Adhesive described for low-surface-energy (LSE) plastics, or PE/PP named | Standard adhesives may never wet out on the hull |
| Cast film, not calendered | Cast film is thinner and more flexible, which helps it conform to curved hulls and resist shrinking |
| Permanent adhesive | Removable adhesives lift sooner |
| Air-release channels | Fewer bubbles, which are lift points on a hard-to-bond surface |
| Rated for outdoor and marine exposure | UV and water exposure still apply to every decal |
On the cast-versus-calendared point, general marine vinyl guidance is consistent: cast films are the better choice on boats because they are thinner, more flexible and more UV stable. Our own breakdown in best vinyl for boats goes into the film types in more depth.
Air-release technology also matters. A cast film with air-release channels, such as a graphic film with a repositionable-style adhesive and air-release channels, is designed for bubble-free installation. On polyethylene, a trapped bubble is more than a cosmetic flaw, because the unbonded area is where lifting starts.
A laminate helps protect the graphic
A clear overlaminate protects printed or cut graphics from abrasion, chemicals and UV. It adds thickness, so it is a trade-off on tight curves, but for flat areas it is worth considering. See our guide to overlaminate and the five checks for choosing a laminate.
Preparing a polyethylene hull
Surface prep decides whether the adhesive has a chance. Film manufacturers are blunt about it: surfaces should be clean, dry and properly tested and prepared, and the film applied immediately after cleaning. Avery Dennison's substrate cleaning and preparation bulletin sets out the baseline, and it is the process below.
Step-by-step prep
- Pick the location. Choose an area above the waterline. Marine-marking guidance from a graphics manufacturer says graphics should be installed above the waterline.
- Wash with warm water and a synthetic detergent. Use one without lotions, waxes, creams or oils. Hand soaps and many boat-wash products leave exactly the residue you are trying to remove.
- Dry with a lint-free cloth. Any moisture or lint left behind weakens contact.
- Remove grease, oil or stubborn dirt with a cleaner. Sunscreen, fish oil and engine grime all count.
- Finish with an isopropyl alcohol wipe when needed. Dry-wipe before the alcohol evaporates so you lift the dissolved residue rather than redeposit it.
- Apply immediately. Even a recently cleaned surface should be cleaned again right before application, because dust and dirt return quickly, as the same bulletin notes.
The science behind this is simple. 3M's guidance on changing surface properties for better adhesion explains that dust, oil, grease and fingerprints reduce adhesive contact and wet-out. On a surface that is already hard to wet, you cannot afford to lose any more of it. Wear clean gloves or handle the decal by its edges and backing paper, and keep your hand off the cleaned area.
Wax, ceramic coatings and antifouling
Polyethylene boats sometimes carry wax, polish or a coating from a previous owner. These create a barrier between the adhesive and the hull. Strip them before you start. We cover the specific cases in our guides on decals on waxed hulls, applying decals before ceramic coating and decals on antifouling paint.
Applying the decal
Once the hull is prepped, application is where small habits pay off.
Conditions
Work in the shade, out of wind, on a dry day. The marine-marking guidance cited above gives an application range of 60 to 90°F (16 to 32°C). A hull left in direct summer sun can run well above the air temperature, so check the surface, not just the forecast. In cold weather, move the boat indoors rather than trying to warm the decal with a heat gun and hoping for the best.
Technique
- Position the decal with masking tape as a hinge. Measure from fixed points such as the bow, the gunwale line or a molded edge so both sides match.
- Peel the backing back gradually, keeping the decal under light tension.
- Working from the center outward, squeegee with overlapping strokes using firm, even pressure. Firm pressure helps drive the adhesive into contact with the surface, which is the whole challenge on polyethylene.
- Use dry application for overlaminated graphics, which the same guidance recommends. Wet application with soapy water can leave moisture and soap residue at the bond line, which is a bad fit for a low-energy surface.
- Remove the transfer tape slowly, pulling back at a sharp angle against the surface. If an edge lifts, lay it back down and press again before continuing.
- Press all edges and lettering corners once more, especially the thin strokes of numbers like 1, 4 and 7.
If you want a visual walkthrough specific to registration numbers, our installation instructions take you through placement and squeegee steps.
Cure time
Do not launch the same day. Marine-marking guidance recommends allowing 48 hours for complete adhesive wet-out before use. During that time, the adhesive continues to flow into the surface and builds its bond. On polyethylene, that waiting period matters more than usual, because the bond starts weaker.
After that, treat the first weeks gently. Avoid pressure washing close to edges, and when you do wash, read our advice on pressure washing decals safely.
Primers, flame treatment and other tricks
Owners of poly boats trade a lot of advice, and some of it is worse than it sounds.
Adhesion promoters and primers. 3M's science-of-adhesion guidance notes that primers or adhesion promoters can improve bonding when a substrate's low surface energy makes adhesion difficult. But product matters. A Practical Sailor test found that a common tape primer did not significantly improve bonding to polyethylene and was not a substitute for proper surface preparation such as sanding or flame treatment. A primer must be labeled for polyethylene or low-surface-energy plastics, and you should test it on a hidden spot first.
Flame treatment. Passing a flame quickly over polyethylene oxidizes the surface and can improve bonding. It must be precise, because too much heat warps or discolors the hull, and its effect fades over time as the plastic returns to its inert state. If you go this route, apply the decal soon after treatment. Because of the risk to the hull, many owners prefer to start with film built for low-energy plastics and thorough cleaning.
Light abrasion. Some owners scuff a poly surface lightly before cleaning. This can help a stubborn spot, but it may show through a thin, light-colored film, so test on an area you can live with.
Sealing edges. Some paddlers overlap a clear plastic-bonding adhesive onto thin decal edges to stop fine details from lifting. That is an owner workaround, not a manufacturer procedure. Use it only where a lifted edge would otherwise ruin the graphic, and test compatibility first.
Do a test patch. Cut a small scrap of the film, apply it in a hidden spot, cure it for 48 hours, and try to peel it. If you can lift it cleanly with a fingernail, the combination will not survive a season.

When decals will not stay: alternatives
Sometimes a hull is too textured, too oxidized or too old for any film. Then the answer is to change the attachment method rather than push harder on the same one.
- Use a different location. A smoother, flat section of the hull gives the adhesive much better contact than a heavily stippled one.
- Use a structural adhesive made for polyethylene. Adhesives marketed for bonding polyethylene exist, and some require sanding and flame oxidation while others need little prep. These are for patches and fittings, not for thin registration vinyl, so follow the adhesive's own instructions.
- Use mechanical attachment. A mounted plate or fitting can carry information where film cannot. 3M's bonding research notes that adhesives and tapes can allow lighter, thinner materials and a cleaner appearance than mechanical fasteners, which is why film remains the first choice when it works.
For registration numbers, check your state's rules before choosing an alternative, since most states specify where and how numbers must appear.
Registration numbers on a polyethylene boat
Registration numbers are not decoration. State rules set the character height, contrast, spacing and placement, and the numbers must stay legible. A decal that peels is more than an eyesore: it can leave you out of compliance on the water.
A few practical points:
- Use a high-contrast color against your hull, such as white on a dark hull or black on a light one, so the characters are readable at a distance.
- Put numbers on a flat, smooth patch above the waterline where you can. Our answer page explains whether numbers go on both sides of the boat.
- Personal watercraft have their own rules: see whether jet skis need registration numbers. Paddle craft do too in some states: see whether kayaks and canoes need numbers.
- Check the rules for your state in our state-by-state regulations before you order.
Outgassing from fresh polyethylene or from adhesives can occasionally show as small bubbles under film. If you see this, read what causes outgassing and how to fix it before you pierce or remove anything.
Perspective: how we think about decals on poly hulls
We make registration decals every day, and the most common question we hear from poly boat owners is whether the vinyl will hold. Our answer is that the decal and the surface work as a system.
Our decals are produced in-house from marine-grade vinyl selected for UV and saltwater resistance, and they are designed to meet state requirements. On a polyethylene hull, the other half of that system is you: the cleaning, the dry application and the 48-hour cure are what let any film make its best contact.
That is why we publish our guidance openly. Our installation page, our regulation pages and our blog guides exist so that the number you order is the number that stays readable on the water. A decal that has a full cure and a clean, dry surface under it has every advantage we can give it.
If you are ordering for a poly boat, take a few minutes with the prep steps above, put the numbers on the flattest area the rules allow, and give the adhesive time. That small effort protects both your compliance and your investment.
Taylor
Order decals designed for your boat
Our online design tool lets you enter your registration number, pick colors and fonts, and see the result in minutes. Custom boat registration numbers and decals are $35.99 per set, produced in 3 to 5 business days, with free shipping in the contiguous United States. We make decals for jet skis, pontoons, bass boats, aluminum boats and center consoles, and marinas and dealerships can order in bulk. Start on the custom boat registration decals page.
Troubleshooting lifting and peeling
If a decal starts to lift on a poly hull, act early.
- Corners lifting in the first week. The surface was probably not clean enough or the pressure was too light. Warm the area gently, press the corner down firmly and hold. Keep it dry for another 48 hours.
- Edges collecting dirt. That indicates a gap at the edge. Clean carefully with a soft cloth and mild soap, not a pressure nozzle.
- Bubbles in the middle. Small bubbles can be pricked with a fine pin and pressed flat. Large bubbles that return suggest trapped air or outgassing.
- Fading numbers. Color loss is a UV issue, not an adhesion issue. Read how to prevent decal fading.
- Whole decal peels cleanly. The adhesive never bonded. Re-clean the hull, switch to a film made for low-energy plastics, and consider a test patch first.
For how long marine vinyl generally lasts under sun and water, see our page on how long marine vinyl decals last. Poly hulls are a harder substrate than most, so a thorough prep is your best protection.
FAQ
Will regular outdoor vinyl stick to a polyethylene boat?
It may look fine at first, but it often fails. Polyethylene is a low-surface-energy plastic that adhesives struggle to wet. Choose a film whose data sheet says it is designed for low-energy plastics such as LDPE, HDPE or polypropylene.
How should I clean a poly hull before applying a decal?
Wash with warm water and a synthetic detergent free of waxes, creams or oils, then dry with a lint-free cloth. Remove grease with a cleaner, then wipe with isopropyl alcohol and dry-wipe before it evaporates. Apply right away.
How long should I wait before launching?
Wait 48 hours. Manufacturer marine-marking guidance recommends that time for the adhesive to wet out fully. Apply in the 60 to 90°F (16 to 32°C) range, above the waterline.
Is primer a good fix for polyethylene?
Not by default. A generic tape primer was found not to improve bonding to polyethylene significantly. Use only a product labeled for polyethylene or low-surface-energy plastics, and test it on a hidden spot first.
Can I put registration numbers on a poly kayak or jet ski?
It depends on your state and the type of craft. Check the state regulations and our pages on jet skis and kayaks before you order.
Sources
- Innovations in Bonding to Low Surface Energy Surfaces (3M)
- Substrate Cleaning and Preparation (Avery Dennison)
- MPI 1100 Cast series data sheet (Avery Dennison)
- Print Wrap Film IJ180mC-10LSE (3M)
- Controltac Graphic Film with Comply Adhesive 180mC (3M)
- Changing Surface Properties for Better Adhesion (3M)
- Application Tips for Marine Marking, film application (Arlon)
- Application Tips for Marine Marking (Arlon)
- Stickier Sail Tape with 3M Primer (Practical Sailor)